As a woodworker, I have found spindle sanders to be an essential tool in my workshop. They are perfect for smoothing out curves, sanding edges, and removing rough spots on wood. However, if you are new to using a spindle sander, it can be a bit intimidating. In this article, I will guide you through the basics of how to use a spindle sander and provide some tips to help you get the most out of this versatile tool.
Firstly, it is important to understand the basic components of a spindle sander. The main part of the tool is the spindle, which rotates at high speeds and is used to hold the sanding sleeve. The sanding sleeve is made of abrasive material and is attached to the spindle. The table is another important component of the spindle sander, and it is used to support the workpiece during sanding. Understanding these parts and how they work together is crucial to using the spindle sander effectively.
Next, it is important to choose the right sanding sleeve for the job. Sanding sleeves come in different grits, and choosing the right one will depend on the type of wood you are working with and the level of sanding required. It is also important to make sure the sanding sleeve is securely attached to the spindle before beginning to sand. In addition, it is important to adjust the table to the correct height and angle before starting the sanding process. By following these basic steps, you can use a spindle sander with confidence and achieve smooth, professional-looking results.
Understanding Spindle Sanders
A spindle sander is a power tool used for sanding curved surfaces and edges. It consists of a motor that drives a spindle, which rotates a sanding sleeve. The spindle is usually mounted on a table, and the sanding sleeve is inserted over it.
Spindle sanders come in different sizes and shapes, and they can be used for various sanding tasks. Some models are designed for small-scale projects, while others are more powerful and suitable for heavy-duty tasks.
One of the advantages of using a spindle sander is that it allows you to sand curved surfaces and edges without creating flat spots or dips. The sanding sleeve conforms to the shape of the workpiece, ensuring a smooth and even finish.
When using a spindle sander, it is important to choose the right size and grit of sanding sleeve for the task at hand. A smaller sleeve is suitable for tight curves and narrow edges, while a larger sleeve is better for broader curves and flat surfaces. The grit of the sleeve determines how smooth the finish will be, with higher grits producing a finer finish.
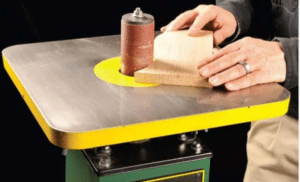
It is also important to use the right technique when sanding with a spindle sander. The workpiece should be firmly held against the sanding sleeve, and the spindle should be rotated at a moderate speed. Excessive pressure or speed can cause the sanding sleeve to wear out quickly or damage the workpiece.
Overall, a spindle sander is a valuable tool for any woodworking project that involves curved surfaces or edges. With the right technique and accessories, it can produce a smooth and even finish that is difficult to achieve with other sanding tools.
Safety Precautions
When using a spindle sander, safety should always be the top priority. Here are some precautions that should be taken to ensure safe usage of the tool:
- Wear Personal Protective Equipment (PPE): Always wear safety glasses or goggles to protect your eyes from flying debris. Additionally, wearing a dust mask can help protect your lungs from inhaling sawdust.
- Secure the Workpiece: Ensure that the workpiece is securely fastened to the table or jig before turning on the spindle sander. This will prevent the workpiece from shifting or flying off the table during use.
- Use the Appropriate Abrasive: Always use the appropriate abrasive for the material being sanded. Using the wrong abrasive can cause the material to burn or become damaged.
- Avoid Loose Clothing and Jewelry: Loose clothing and jewelry can easily get caught in the spindle sander, causing injury. Be sure to remove any loose clothing or jewelry before using the tool.
- Keep Hands Away from the Spindle: Keep your hands and fingers away from the spindle while it is in use. This will prevent injury and ensure that the sanding is done evenly.
- Do Not Force the Workpiece: Let the spindle sander do the work. Forcing the workpiece can result in injury or damage to the tool.
- Keep the Work Area Clean: A clean work area helps prevent accidents and injuries. Make sure to clean up sawdust and debris from the work area before and after using the spindle sander.
By following these safety precautions, you can ensure safe usage of the spindle sander and prevent accidents and injuries.
Setting Up the Spindle Sander
Assembling the Spindle Sander
Before using a spindle sander, it is important to assemble it correctly. First, ensure that all the parts are included in the package. Then, attach the table to the base using the screws provided. Next, attach the spindle assembly to the table using the screws provided. Finally, attach the dust port to the spindle assembly using the screws provided.
Choosing the Right Sanding Sleeve
The sanding sleeve is the part of the spindle sander that actually sands the wood. It is important to choose the right sleeve for the job. The sleeve should be the same size as the spindle on the sander. Additionally, the grit of the sleeve should be appropriate for the type of wood being sanded. Coarser grits are better for removing material quickly, while finer grits are better for finishing.
Adjusting the Table Height
The height of the table is important for achieving accurate and consistent results. To adjust the table height, loosen the locking knob and raise or lower the table as needed. Once the table is at the desired height, tighten the locking knob to secure it in place.
In summary, assembling the spindle sander correctly, choosing the right sanding sleeve, and adjusting the table height are all important steps in setting up a spindle sander for use. By following these steps, you can ensure that your spindle sander is ready to use and will produce accurate and consistent results.
Basic Operation
When using a spindle sander, it is important to understand the basic operation of the machine before getting started. In this section, I will cover how to turn on and off the spindle sander.
Turning On the Spindle Sander
To turn on the spindle sander, follow these steps:
- Plug in the machine and make sure it is securely connected to a power source.
- Locate the power switch on the machine and turn it to the “on” position.
- Wait for the spindle sander to reach its full speed before beginning to use it.
Turning Off the Spindle Sander
When you are finished using the spindle sander, it is important to turn it off properly. Follow these steps:
- Turn off the machine by switching the power switch to the “off” position.
- Wait for the spindle to come to a complete stop before unplugging the machine.
- Clean the sanding drum and table before storing the machine away.
Remember to always follow the manufacturer’s instructions when using the spindle sander. By understanding the basic operation of the machine, you can ensure safe and effective use.
Advanced Techniques
Sanding Curves
When sanding curves, it is important to use the right size drum and sandpaper grit. I typically use a 3/4 inch drum and 80 grit sandpaper for most curves. However, for tighter curves, a smaller drum may be necessary. It is also important to keep the spindle sander moving constantly to prevent any grooves or dips in the wood.
One technique I like to use when sanding curves is to start at the top of the curve and work my way down. This helps prevent any tear-out or splintering on the wood. I also like to use a back-and-forth motion while sanding to ensure even sanding across the entire curve.
Sanding Internal Cutouts
Sanding internal cutouts can be a bit tricky, but with the right technique, it can be done easily. First, I like to start with a smaller drum and sandpaper grit, such as a 1/2 inch drum and 120 grit sandpaper. This allows me to get into tighter spaces without damaging the wood.
I then use a slow and steady motion while sanding the internal cutouts, being careful not to apply too much pressure. It is important to let the spindle sander do the work and not force the wood into the drum. I also like to use a dust collection system to prevent any dust or debris from getting in my eyes or lungs.
Sanding End Grain
Sanding end grain can be challenging, but with the right technique, it can be done smoothly. I typically start with a larger drum, such as a 1 inch drum, and 80 grit sandpaper. I then use a slow and steady motion while sanding the end grain, being careful not to apply too much pressure.
One technique I like to use when sanding end grain is to sand at a slight angle. This helps prevent any tear-out or splintering on the wood. I also like to use a dust collection system to prevent any dust or debris from getting in my eyes or lungs.
Overall, these advanced techniques can help you achieve smooth and even sanding with your spindle sander. Remember to always use the right size drum and sandpaper grit, and to let the spindle sander do the work. With practice and patience, you can become a master at using your spindle sander.
Conclusion
In conclusion, using a spindle sander is a great way to achieve smooth and precise sanding results. By following the proper safety guidelines and techniques, you can create professional-looking woodwork projects with ease.
Throughout this article, I have covered the basics of spindle sanders, including their various types and uses. I have also provided step-by-step instructions on how to use a spindle sander, from setting up the machine to sanding different types of wood.
Remember to always wear the appropriate safety gear, such as eye and ear protection, when using a spindle sander. Keep your work area clean and free of debris, and be sure to unplug the machine when not in use.
Lastly, practice makes perfect. The more you use your spindle sander, the more comfortable and confident you will become with it. Don’t be afraid to experiment with different sanding techniques and settings to achieve the desired results for your project.
Overall, a spindle sander is a valuable tool to have in any woodworker’s arsenal. With its versatility and precision, it can help take your woodworking skills to the next level.

Reader Interactions