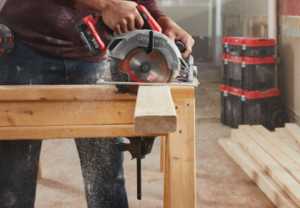
Craftsman circular saws are a popular choice among DIY enthusiasts and professionals alike due to their durability and precision. However, changing the blade on a circular saw can be a daunting task for those who are unfamiliar with the process. In this article, we will provide step-by-step instructions on how to change the blade on a Craftsman circular saw, so you can get back to your project with ease.
Before beginning the blade replacement process, it is important to ensure that the saw is unplugged and the blade is completely stopped. It is also recommended to wear protective gloves and eyewear during the process. Once safety measures have been taken, the user can begin by locating the blade release button or lever on the saw. This button or lever will allow the user to loosen the blade and remove it from the saw.
Understanding Your Craftsman Circular Saw
Parts of the Saw
Craftsman circular saws are made up of several parts that work together to make precise cuts. Here are some of the essential parts of the saw:
- Blade: The blade is the circular part of the saw that makes the cut.
- Guard: The guard is a safety feature that covers the blade when it’s not in use.
- Shoe: The shoe is the flat plate that rests on the material being cut.
- Depth Adjustment: The depth adjustment allows you to adjust the depth of the cut.
- Bevel Adjustment: The bevel adjustment allows you to adjust the angle of the cut.
Safety Precautions
When using a circular saw, it’s important to take the necessary safety precautions to avoid accidents. Here are some things to keep in mind:
- Wear safety glasses and ear protection.
- Keep your fingers away from the blade.
- Secure the material being cut to prevent it from moving.
- Make sure the blade is properly tightened before use.
- Disconnect the saw from the power source before changing the blade.
By understanding the parts of your Craftsman circular saw and taking the necessary safety precautions, you can safely and effectively change the blade and make precise cuts.
Identifying the Blade Type
Before you can change the blade on your Craftsman circular saw, you need to know what type of blade you have. There are several different types of circular saw blades, each designed for a specific task. Here are a few common blade types you may encounter:
Rip Blades
Rip blades are designed to cut with the grain of the wood. They have fewer teeth than other types of blades, which makes them more aggressive and faster at cutting. Rip blades typically have teeth that are flat on top and square to the blade, which helps them cut through the wood cleanly.
Crosscut Blades
Crosscut blades are designed to cut across the grain of the wood. They have more teeth than rip blades, which makes them slower but more precise. Crosscut blades typically have teeth that are angled and beveled, which helps them slice through the wood cleanly.
Combination Blades
Combination blades are designed to handle both ripping and crosscutting tasks. They have a mix of teeth, some of which are angled and some of which are square. Combination blades are a good choice if you need to switch between ripping and crosscutting frequently.
Specialty Blades
There are also specialty blades available for specific tasks, such as cutting metal or concrete. These blades are designed with specific materials and coatings to withstand the rigors of the task at hand. Be sure to use the appropriate blade for the job to ensure a clean, safe cut.
Identifying the blade type is the first step in changing the blade on your Craftsman circular saw. Once you know what type of blade you have, you can proceed with confidence knowing that you have the right tool for the job.
Tools Needed for Blade Change
Changing the blade on a Craftsman circular saw is a simple process that requires a few basic tools. Before starting the blade change, ensure that the saw is unplugged to prevent any accidents. Here are the tools needed for the blade change:
1. Allen Wrench
An Allen wrench is a small L-shaped tool used to loosen and tighten bolts and screws. Most Craftsman circular saws come with an Allen wrench that fits the blade bolt. If you don’t have one, you can purchase an Allen wrench that fits the size of the bolt on the saw.
2. Blade Wrench
A blade wrench is a tool used to hold the blade in place while you loosen the bolt. Craftsman circular saws come with a blade wrench that fits the blade bolt. If you don’t have one, you can purchase a blade wrench that fits the size of the bolt on the saw.
3. New Blade
You will need a new blade to replace the old one. Make sure that the new blade is the correct size and type for your saw. Check the owner’s manual or the old blade for the correct specifications.
4. Work Gloves
Work gloves will protect your hands from the sharp edges of the blade and the saw. Choose gloves that are durable and fit well.
5. Safety Glasses
Safety glasses will protect your eyes from any debris that may fly off the blade or the saw. Choose safety glasses that fit well and have clear lenses.
With these tools, you can easily change the blade on your Craftsman circular saw.
Preparation for Blade Change
Unplugging the Saw
Before starting any work on the circular saw, it is essential to unplug it from the power source. This step will prevent any accidental start-up of the saw and ensure the safety of the user. If the saw is cordless, remove the battery before proceeding with the blade change.
Setting Up Your Workspace
The next step is to prepare the workspace for the blade change. It is recommended to work on a flat and stable surface with adequate lighting. The workspace should be clear of any debris or obstacles that could interfere with the blade change process.
To make the process more efficient, gather all the necessary tools and equipment required for the blade change. This includes a new blade, a wrench, and any other tools specified in the user manual. It is also recommended to wear protective gear such as safety glasses and gloves to prevent any injuries.
Once the workspace is prepared, the user should follow the manufacturer’s instructions for removing the blade from the circular saw. The user manual will provide detailed instructions on how to remove the blade and install a new one. By following the instructions carefully, the user can ensure a successful blade change and safe operation of the circular saw.
Steps to Change Blade
Changing the blade on a Craftsman circular saw is a simple task that can be done quickly and easily with just a few steps. Here are the steps to follow:
Removing the Old Blade
- Turn off the saw and unplug it from the power source.
- Locate the blade lock button on the saw. It is usually located near the blade guard.
- Push the blade lock button and hold it down.
- While holding down the blade lock button, use a wrench to loosen the bolt that holds the blade in place. Turn the bolt counterclockwise to loosen it.
- Carefully remove the old blade from the saw.
Installing the New Blade
- Make sure the new blade is the correct size and type for the saw.
- Place the new blade onto the saw, making sure that the teeth are facing in the right direction.
- Tighten the bolt that holds the blade in place. Use the wrench to turn the bolt clockwise until it is snug.
- Release the blade lock button.
- Plug the saw back in and turn it on to make sure the blade is installed correctly.
It is important to make sure the blade is securely tightened before using the saw. A loose blade can cause damage to the saw or injury to the user. By following these simple steps, anyone can change the blade on a Craftsman circular saw with ease.
Post Blade Change Tasks
After changing the blade on a Craftsman circular saw, there are a few tasks that need to be performed to ensure the saw is ready for use. This section will cover two important post blade change tasks: checking the blade installation and testing the saw.
Checking the Blade Installation
The first task after changing the blade is to verify that the blade is installed correctly. This is important to ensure that the saw operates safely and efficiently. Here are the steps to follow:
- Turn off the saw and unplug it from the power source.
- Check the blade for any signs of damage or wear.
- Verify that the blade is installed in the correct orientation. The teeth of the blade should be facing forward and the arrow on the blade should be pointing in the direction of the saw’s rotation.
- Tighten the blade nut securely using a wrench.
Testing the Saw
The second task after changing the blade is to test the saw to make sure it is operating correctly. Here are the steps to follow:
- Turn on the saw and let it run for a few seconds to ensure that the blade is spinning correctly.
- Check the blade for any wobbling or vibrations. If the blade is not running smoothly, turn off the saw and check the blade installation again.
- Make a test cut on a scrap piece of wood to ensure that the saw is cutting cleanly and accurately.
- Adjust the depth of the blade if necessary.
By following these post blade change tasks, you can ensure that your Craftsman circular saw is ready for use and will operate safely and efficiently.
Troubleshooting Common Issues
Blade Doesn’t Fit
If the blade doesn’t fit on the Craftsman circular saw, it can be due to a few reasons. First, make sure that you have the correct size blade for your saw. Check the user manual or the manufacturer’s website to find out the correct blade size for your saw.
If you have the correct size blade, but it still doesn’t fit, check if there is any debris or rust on the blade arbor or the blade itself. Clean the arbor and the blade with a clean cloth and try fitting the blade again.
In some cases, the blade may be warped or bent, which can prevent it from fitting properly. Inspect the blade for any signs of damage and replace it if necessary.
Saw Doesn’t Operate After Blade Change
If the saw doesn’t operate after changing the blade, there could be a few reasons for this issue. First, make sure that the blade is installed correctly and tightened securely.
If the blade is installed correctly, check if the power cord is plugged in properly and the power switch is turned on. If the saw still doesn’t operate, check the circuit breaker or fuse to make sure that it hasn’t tripped or blown.
In some cases, the saw may have a safety feature that prevents it from operating if the blade guard is not properly installed. Check the blade guard to make sure that it is installed correctly.
If none of these troubleshooting steps work, it may be necessary to take the saw to a professional for repair.
Conclusion
In conclusion, changing the blade on a Craftsman circular saw is a simple and straightforward process that can be done by anyone with basic knowledge of tools. By following the steps outlined in this guide, users can easily replace the blade and ensure that their saw is operating at its best.
It is important to remember to always prioritize safety when working with power tools. Users should wear appropriate safety gear, such as eye and ear protection, and take caution when handling sharp blades.
Craftsman circular saws are versatile and powerful tools that can be used for a variety of cutting tasks. By knowing how to change the blade, users can ensure that their saw is always ready to tackle any job that comes their way.
Whether you are a professional contractor or a DIY enthusiast, having a reliable and well-maintained circular saw is essential. With the information provided in this guide, users can confidently change the blade on their Craftsman saw and keep it in top condition for years to come.

Reader Interactions