Repairing drywall is a time and cost effect.
Drywall is versatile and when repaired properly it is impossible to tell there was any damage to begin with.
Repairing The Smallest Holes
The diameter of hole size that needs to be repaired has everything to do with the way it is patched, and finished. There are many proposed methods of treating these repairs in the wallboard. But by sticking to proven methods you are far ahead.
The hole that is narrow, say the diameter of a pencil or less, is the easiest to fix.
Step 1

Clean the hole of any loose debris or the object that caused the hole and view the surface of the hole up close. Check to see if there is a much of rise around the small opening.
Commonly when enough force has been exerted to push through the wallboard, a small outburst is left since many anchor styles act to compress the gypsum when inserted.
Depending on the degree of rise, tap with a nail-set and hammer to countersink any rise. Tap with only enough force to set level with patch, and no more.
Step 2
Press a small dab of compound into the opening with a slim putty knife, filling the hole.
Then give a wipe clean in circular motions around the border to blend off and leave to dry.
Step 3
Sand off any excess lightly, and if needed, apply a second coat and sand again.
Repairing Medium Sized Holes
Moving out of the smallest hole sizes and into wider openings, the repair takes a technique that will provide some structure to the fix.
The increase in hole sizes normally require added reinforcement for the patching compound. To repair penetrations through the drywall up to 2.5″ to 3″ structural technique is applied.
To get started you’ll need to buy metal kit patches, available in 4 x4″, 6 x 6″ and 8 x 8″ dimensions. They have adhesive backed mesh and are designed to stick to the surface in a swift move and take a quick layer of compound.
The steps on how to repair can vary by manufacturer, but here’s how to apply them:
Step 1
Clear the inner edges of the hole. Remove any loose chunks and semi-attached pieces of gypsum which happen to be there and cut free any compromised paper membrane on the surface.
Using a sharp breakaway knife will leave a clean edge but be sure to wear eye protection.
Step 2
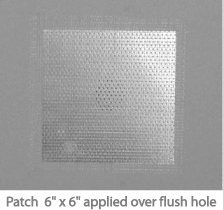 Make sure you select a large enough square patch and stick it directly over the hole pressing firmly throughout.
You will want at least a 1″ clearing around the hole at minimum to ensure the strength of the repair.
Now you are ready you to mudd.
Step 3
 Float on a quick and even mudd level, barely covering the mesh.
Note that it is feasible to achieve high grade results from single mudd and sanding with this repair type – given that the coating layer is put on in a consistent and even plane.
This is the main advantage of patching with this method.
Kudos goes to the extreme flatness and rigid makeup of the patch.
Step 4
 After it has thoroughly dried, superficially abrade the surface with a sanding block or sponge. You will want to have a sheet of plastic below to keep the dust off the flooring.
A fine grit sander is best, particularly if the surface is to receive paint having any gloss. Scratches from rough papers will show through.
While some pros feel the metal structure forms an insubstantial backing, others attest to it as a strong and carefree fix.
Whatever the case, these finished patches should probably best be left to aesthetics, with no driving of nails or setting of screws through them.
Patching a Large Hole in Drywall
To repair larger damage, we are going to need to create a backer in order to insert a new piece of drywall to repair the damaged section.
The this method you are going to require the following:
- A piece of drywall
- Compound
- T square
- Pencil
- Tape
- Drywall saw
- 1″ x 3″ wood strips
Step 1
Measure the dimensions surrounding the damaged area of the hole with a tape measure, both the width and the length, in the shape of a square or rectangle.
Take note of the bracing behind the patch – and either center the patch 1.5″ away from the joist or cut to expose the stud.
Transfer these dimensions onto a spare piece of wallboard, and laying a straight edge or with a T-square as a guide, mark and cut the patch piece.
Straighten any gypsum at the edges with the rasp.
Step 2
Hold the wallboard replacement over the hole damage and trace its outline with a pencil.
Then cut the new patch opening with a drywall saw, or electric gypsum cutter (set at the depth of the drywall – an advantage of the cutters is that they are less apt to hit wiring and other objects when properly handled).
Note that the new opening is to be oversized by only a minor amount. If not, the patch won’t fit in the opening.
Step 3
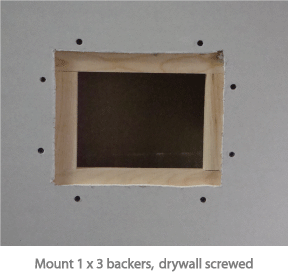 Saw the strips of 1 x 3’s and mount from the backside. They should extend at 1″ to 1.5″ beyond the open endings.
Drive screws through the drywall, located at least 1/2″ from the cut edge, to cinch the flush backers into place.
The backers should now surround the border at all sides.
Step 4
Place the cut piece into the backed opening, covering it closed.
Screws should then be driven through the corresponding sides of the cut-out.
If a stud has been exposed, secure the patch here at the stud and at the original studded wallboard line(s).
Step 5
 With the cut-out now screwed in place, tape the perimeter with either mesh tape.
Make sure to you are overlapping at the corners and extending out about 1 and 1/2″ at the corners.
Your patch is now ready for mudding.
Step 6
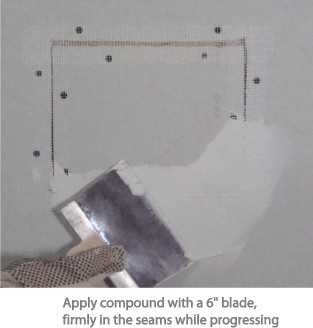 If mesh tape is applied, skim with mudd as you normally would, cautious of any mesh fibers with the knife blade, gently pushing around the seam areas for a solid bond.
Step 7
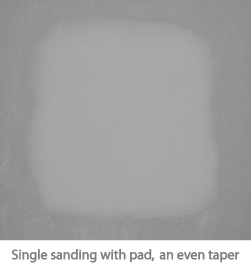
Once dry, sand gently to eliminate high spots. Then re-apply mudd.
As a tip, it often helps to apply denser mixes of mudd for bedding the taping, than for topping off.
Based on wall levels and patch sizes, floating off the layers of mudd a half-a-foot plus beyond the replacement is basic to making the broader patches invisible after completion.
Upon drying, finish sand with a pad to evenly blend with the wall. Of course any multiple holes should be addressed in stages.
Other Drywall Guides
- The best electric drywall sanders
- The best stilts for drywall
- The best lifts for drywall

Reader Interactions