The Basics on Hanging Drywall on Ceilings
The sheets of drywall on the ceiling are mounted perpendicular to the direction of the joists.
The challenge with hanging ceilings, is moving the drywall into place. Particularly since larger sheets are lifted into this more obvious surface.
1. Marking ceiling joints
Mark the position of the ceiling joints around the perimeter of room on the upper wall framing with a pencil.
Also note the position of any canned lighting, electrical boxes, and fixtures.
You’ll need to know where the joints and fixtures are when it comes to securing the drywall in place.
2. Apply Adhesive to joists
This is optional, but if you have opted to do so then apply adhesive to the joist surface(s). Run beads from the caulk container as far as the lead work-time allows.
3. Placing the first panel

Starting in a corner of the ceiling, raise and hold the sheet of drywall in place with the assistance of a second person, a T-Brace or ‘Deadman’ or panel lift
Either a single T-Brace can be propped or two T-Brace’s can be propped together to secure the position of the sheet and these braces should be slightly taller than the height of the ceiling. Hold the sheet snugly for fastening.
Note: some building codes require 5/8″ thick panels for ceilings and/or fire rated boards. But to many installers this is standard practice.
4. Securing the Panel in Place
 Screws are preferred over nails but if you drive ring shank nails, space these at about 7 inches apart.
With adhesive, space the nails 1/3 across the board, or 16 inches apart.
Make the concave dimple with the drywall hammer on the second swing. Be sure not to burst the paper.
For screws – drive the screws straight in, spaced 12″ on center without adhesive, and at most 16″ on center with adhesive.
Set them no closer than 3/8″ from the edge of the sheet. Any misses should be reversed and avoid the joist edges, if possible.
5. Panels that Need Cutting
Partly fasten any sheet having outsets (that are to receive cuts) such as electrical boxes and can lighting.
Run the power cutter first by finding a center portion, then proceed around the perimeter. Or else, saw manually with a hand saw.
Next complete the screw tightening of the panel, and move on to complete the course down the entire length of the ceiling.
6. Hanging the Rest of Panels
Continue with the second course by staggering the butt seams at 1/2 sheet from the first course.
Note: some older ceilings joists are 24″ on center. One possibility is to mount 5/8″ or sag resistant panels on these wider spans where weight is a concern.
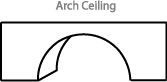
Installing Drywall on Vault Ceilings
 Where the ceiling is pitched, install the sheets as you normally would with one exception…
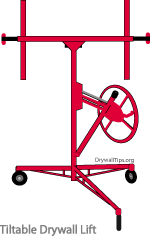
Load the wallboard onto a drywall lift that is tilt-able. The steeper the pitch, the more the situation will call for and rely on cradle hooks for edge-on support and to avoid slippage when the sheet is being hoisted and held steady.
A wider base will stabilize the taller carries. This is critically important for safety reasons.
Fasten the sheets with nails or by driving screws as you would for a flat ceiling. Although this will entail driving screws from second-person access, as from a ladder, scaffold or electric lift.
The hoist works well amazingly well for vault ceilings and also standard flat ceilings. Certain models can deliver to ceilings to 11′ and taller, take sheets up to 16′ , and, with the tilting craddle, deliver onto sloped wall applications.
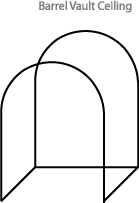
But barrel vaults and arches are lifted in a straight-on manner, since the lift platform does not accommodate these curvatures.
For ceilings with curvature, such as a barrel vault, install flex sheets, which are thinner sheets of drywall, that bend with the curve and flow with the arc — making sure that any differences in thickness align flush.
For cathedral ceilings the steepness of pitch will in-part determine the method of getting the drywall up there. The total height too, will contribute to the method of mobilizing the wallboard into position.
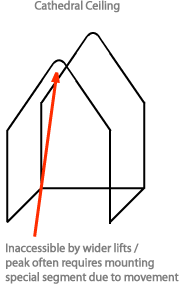
The tallest ceilings will require the auto lift, say ceiling heights in excess of the 19′ range at their lowest point.
Though using these lifts will mean offsetting their significant operating costs, even with the lift for the installer likely to be procured from a local rental outlet given the prospect of their new price tags and storage requirements.
Clearly though the automatic lift does provide the greatest production capabilities. This however assumes many sheet applications, higher ascent, or otherwise difficult means of access. At reduced elevations and lesser square footages to be covered, the manual tripod lift suits most applications. Addressing the tradeoff is best done on a case-by-case basis.
Access is required for finishing alike so the sharing of scaffold, whether rolling, static, or what you have might prove mutually worthwhile.
For ceilings supported by large trusses – many homes experience ‘truss uplift’ – basically, the movement between the high and low chords of the truss.
This is caused by a change in the moisture content of the framing truss. Effectively, pulling or temporarily bowing the bottom chords upward, which brings on ceiling cracking.
A pre-treatment for this is to cause a float in the wall by nailing higher from the corner (where the ceiling meets the wall) than you normally would and/or attach drywall clips on the inner/partition walls. Relieving a portion of the stress, or deflection in these joint areas.
Installing Drywall at Ceiling Boxes
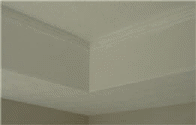
The detail of a decorative box, transitions between the ceiling and wall. But its’ installation brings in precautions due to the narrow drywall being put up and the way it should be fastened.
The Framing
View the framing as you normally would, before the install, however be ever aware of any out-of-order lines since these are what the box will be spotlighting. Although certain wide flex beads are designed to conceal minor voids in framing.
Also, the narrow strips don’t hold up to bowing with a tendency to crumble under meagre stress, depending on the dimensions of the cut. The wallboard direction it was cut from also matters since drywall is most durable from end to end.
Cutting the strips
Rather than simply scoring and snapping, as on wider sections, start with a sharp knife and proceed deep into the wallboard with the aid of a straight edge, running the knife again and again.
Gradually bend the board back, and sever the cut with minimal stress. Another choice is a power cutter, which would execute the cut with little stress.
Attaching the strips
Professional installers lean toward tacking on the strips, since driving screws run the risk of collapsing the internal gypsum. For this reason, tack nails on at an greater inset.
All outer corner edges should line up with no visible rises. For bevels like the one pictured, plan for a flexible bead to finish with as you normally would install corner bead angles as this style of bead too, requires less stress and vibration.
Other Drywall Guides

Reader Interactions